Contents:
Getting Started
Instructions for scanning the room
Proctortrack Support
Minimum System Requirements for Mac and PC Devices
Minimum Mobile App Requirements
Additional Requirements for Mac OS and Windows OS
Onboarding Exam Steps (First Time Test Takers Only)
Registration and Conformation Emails Prior to Exam Date
Steps to Follow on the Day of Your Exam
Appendix A-- Onboarding Exam Rules
Appendix B-- Removing Restrictions on Windows Device
Appendix C-- Mac Device Permissions
Appendix D-- Troubleshooting Onboarding
Appendix E-- Troubleshooting Scheduled Exam
Appendix F-- Acceptable Forms of Identification
Getting Started
Please be advised it can take 30-45 minutes to complete the entire process of connecting to a Live Proctor. This process includes identification verification and securing the testing environment.
Note: Learners are advised to have their mobile phones charging for the duration of the exam.
Learners are required to have the following equipment to take their exam:
• Desktop computer or laptop. (Tablets, Chromebook and mobile phones do not meet the requirements for the exam delivery software.)
• Webcam (resolution 800 x 600 or better)
• Microphone and speakers
• Keyboard
• Mouse
• High speed Internet connection
All Learners will also require a smart phone to complete the room scan and to operate as a second camera during exams. Both Android and iOS mobile phone devices are supported. See minimum phone requirements listed below:
• Android OS: version 10 and above.
• iOS (Apple): version 12 and higher.
• Mobile phones should have a working camera, be 100% charged and have the Proctortrack app downloaded before beginning an exam.
• Mobile phones are required to be positioned in landscape, selfie-mode, keeping the learner, computer monitor, keyboard, and mouse within view of the mobile camera.
• Phone stands, phone cases with built-in stands, or a clear glass cup, can be used to prop up the mobile phone during virtual exams.
Note: Harmony OS not supported at this time.
Instructions for scanning the room:
Learners are required to ensure the testing environment is and will remain comfortable, quiet, and free of distractions during the scheduled exam. The following is required and will be confirmed by the proctor:
• An indoor, private, and quiet location (learners will not be permitted to write the exam in a room where a clear glass wall would allow their computer screen to be viewed by another individual).
• Learners must be seated so that a blank wall is immediately behind them during testing. Any pictures, artwork or other wall hangings must be removed.
• If there are permanent fixtures that cannot be removed from the wall, the space does not meet the testing space requirements and an alternative must be found.
• If the learner is writing with empty space, or an open room behind them, the space does not meet the testing space requirements and an alternative must be found.
• Learners should review the Examination Policy for the full list of Examination Day Protocols.
Proctortrack Support
If you encounter a technical problem, you can ask the proctor for help. You will be able to communicate with the proctor via chat at any time during your exam. If the proctor is unable to help you resolve the technical issue, you will be directed to contact the Proctortrack technical support line via live-chat, phone or email.
• For live chat visit the support page https://proctortrack.com/.
• Or call the dedicated Proctortrack technical support line for Humber learners: 1(844) 966-1155.
What do I need to take an exam using Proctortrack?
What do I need to take an exam using Proctortrack?
OPERATING SYSTEM | PROCESSOR/ RAM | BROWSERS | PLUG-INS | CAMERA RESOLUTION | INTERNET CONNECTION | MOBILE PHONE | PRIVILEGES |
MAC: macOS High Sierra 10.15 or higher PC: Windows 10 or higher | MAC: Intel / AMD Processor, 8 GB RAM PC: Dual-core 2.4 Ghz CPU, 8 GB RAM or better | Google Chrome v100.0 or higher Mozilla Firefox v100.0 or Higher, | Javascript Enabled & Third Party Cookies Enabled | 800 x 600 resolution or better | Cable Modem, DSL or better (1.5 Mbps download for both download and upload). | Android: 10 and above, iOS: 12 and above | Ensure you have Admin Privileges. Avoid using work computers. |
Detailed technical requirements: https://www.proctortrack.com/tech-requirements/
Onboarding Exam Steps (First Time Test Takers Only)
Note: The onboarding exam is an important step for virtual exams. All learners must complete the onboarding exam prior to the scheduled exam date. The onboarding exam will complete a system check of learners’ devices to ensure it is compatible with Proctortrack. The Onboarding exam will also complete an identification check, building the learners baseline profile. The onboarding exam should only be completed by first time test takers. Learners who have already taken a virtual exam and have successfully passed the onboarding exam do not need to complete the onboarding exam again. The onboarding exam is valid for a year.
1. Enter https://ca-testing.verificient.com in your address browser line.
2. Please login using your Proctortrack username and password.
a. First time exam takers will receive an email notification from Proctortrack to complete the onboarding exam within two weeks before the scheduled exam date. The email will include their Proctortrack credentials.
b. All learners must pass the onboarding exam at least a day before the scheduled exam date.
c. It is recommended to change the password after you login.
d. Refer to Appendix A – for a list of the onboarding exam rules and sample email notifications.

3. Click on Go to Test button for the onboarding exam.

A message box will appear with details of your exam time, proceed to click on Go to Test.
4. Scroll down and read the information provided under the Let’s Get Started guidelines.


5. Checkmark the box at the bottom of the page to agree to the terms.

6. Follow the instructions presented on the screen. Pay attention to the banner messages displayed (see image below).
Step 1: Open the App and click on Connect to Proctortrack button.
Step 2: Click anywhere on the app screen to proceed further.
If you do not have the app, please follow the instructions to download:
Step 1: Click on the Download Proctortrack button. After download is complete proceed to click on Connect to Proctortrack.

Note: If you are unable to download the Proctortrack app, please refer to Appendix B if you are using a Windows device and Appendix C if you are using a Mac device.
7. If it’s taking longer than 10 seconds to initiate the app, follow the instructions displayed on the screen.
Step 1: Go back to the browser (you can drag the app on the side).
Step 2: Click on the Connect to Proctortrack button.
Step 3: Come back here and click anywhere inside the app.

8. Read over the Agreement to Policy and check mark the box to confirm your consent only after you have read the information. Click on I agree to proceed.

9. Your device will now complete a system check. if you are using a windows device, you may come across a fire wall pop up on your screen. Select allow access to continue with the app.
Note: At system check, you might get blacklisted apps error. You can refer below screenshot for same. You need to close them from background.


10. After the system check you are ready for the onboarding exam. Click on Continue to proceed.

11. You will be prompted to verify your identity. Ensure to read the information provided on the screen, then click on Continue to proceed.

12. You will now be prompted to complete a Face Scan.
a) Click Scan and follow the instructions displayed on the page to ensure a proper face scan is captured.
b) Once the face scan is captured click on Next to proceed. If the face scan is blurry click on Retake to capture again.

13. You will now be prompted to complete an ID Scan:
a) Position your ID and ensure that the reflection of light is not hiding the text.
b) Click on Start Scan and hold the ID for 10 seconds.
c) Ensure that the text in your final ID scan is readable.
d) Provincial health cards are not accepted. Please review the Appendix F for approved Government issued ID.
e) Click on Next once you complete your ID scan to proceed.

14. Click on Next. The page will list a set of rules and guidelines of what is allowed for the duration of the exam. Scroll down the page to read over the information provided.

15. You will be prompted to complete a room scan. Follow the instructions displayed on the screen to capture a correct scan.

16. At this stage learners will use their mobile devices and scan the bar code to complete a room scan. Please ensure you have the proctortrack mobile app downloaded.
a) If you have not already downloaded the Proctortrack app visit proctortrack.com/mobile-app on your phone or visit the App Store or Google Play Store.
17. Launch the Proctortrack mobile app and scan the QR code using the mobile app. Follow the mobile app directions (shown below) to produce a 360-degree scan of your room. Once completed successfully the page will automatically forward to the next step.
a) On your mobile device proceed to read the agreement policy check mark the box and click Next to proceed. You may have to adjust the permission settings on the app. Simply enable the permission settings to proceed.
b) The app will proceed to complete a system check on your mobile device select Start to begin.
c) Select Ok after the system check to proceed with the room scan.
18. Follow the instructions presented on your mobile.
a) Record a 360 degree 20-second-long video of you room including left, right and behind you.
b) Record a 10 – second-long video including: your desk, set up, monitor (front), monitor, (back).
19. You can retake your room scan if needed. Once your room scan is completed select Next to proceed and your test will start on your monitor.
20. Plug in your phone if its less than 80% charged into a power source and position it on landscape, selfie mode next to you. (Note: Phone stands, phone cases with built-in stands, or a clear glass cup, can be used to prop up the mobile phone during virtual exams.) Make sure that you and your monitor are within the phone camera view just like in the image below.
a.) When you are done, return to the desktop app and click the button Confirm & Start Proctoring and, on your mobile, proceed to click on I am ready to position my phone.
• On the desktop app if you are curious to learn about how Proctortrack protects your data you can proceed to select “Click Here”.


21. Monitoring is now active on the mobile device.
22. Learners can see themselves being recorded in the bottom right corner of the screen. a. The footage can be minimized by clicking on the top right corner of the video feed.
b. Use the arrows to move the video feed to the left or right of the screen.

23. Complete and submit the onboarding exam by clicking on any of the End buttons displayed.
24. A pop up will appear, proceed, and click on End.
25. The onboarding exam will begin to upload do not quit the app. The time it takes to upload the data would be dependent on the internet speed.

26. Once the upload is complete proceed to click on Quit App to close and save the application. If you are using a windows device, you have the option to Uninstall the app to remove Proctortrack from the desktop. You can also take a 2-miunte survey.
27. Proctoring has now ended on the Mobile Phone as well. The app will close on the mobile in 5 seconds automatically. If does not close you can proceed to click on Quit Now on the mobile phone.

Note: Once you complete and submit your onboarding exam you will receive two emails from Proctortrack informing you that the onboarding exam is being processed. You will receive a final email from Proctortrack once the onboarding exam is approved.
If the onboarding exam is not approved, an email will be sent by Proctortrack and the onboarding will have to be attempted again. Learners must have an approved onboarding exam prior to the scheduled exam date. The status of your onboarding exam is located on the Proctortrack dashboard.
Registration and Conformation Emails Prior to Exam Date
Prior to the scheduled exam date learners will receive two emails from Proctortrack.
1. Registration Email – This email will be sent 3-4 business days prior to the scheduled exam date. This email is issued once the registration is processed internally.
2. Confirmation Email – This email will be sent 12-24 hours prior to the scheduled exam date. This email is sent as a final confirmation that your exam has been successfully scheduled.
Steps to Follow on the Day of Your Exam
1. Login to your Proctortrack account using your Proctortrack username and password at https://ca-testing.verificient.com on the day of your exam.
a. Ensure your workstation is clear and distraction-free.
b. During the exam session, you must be in the proctor’s view at all times.
c. Learners will not be able to start the exam prior to the scheduled time slot.
2. Click on Go to Test under the scheduled exams.

3. Click on Go to Test once the button is active at the scheduled time of the exam.

4. To contact the Proctortrack support team at any time, use the chat widget on the bottom right corner of the page.
5. Follow the same steps from the Onboarding Exam.
Please see above steps 4 to steps 7 from the Learner Guide.
6. During the first time you launch the app it may take about 2 minutes for the app to get started.

7. Follow the same steps form the Onboarding Exam.
Please see above steps 8-12 from the Learner Guide.
8. Once your face scan is approved click on Next to proceed.
Follow above steps 13-17 from the Learner Guide.

9. Follow the instructions presented on your mobile.
a. Record a 360 degree 20-second-long video of you room including left, right and behind you.
b. Record a 10-second-long video including: your desk, set up, monitor (front), monitor (back).
c. After the 10-second-long video your room scan will be under review by the proctor.

10. Once you complete your room scan the proctor will then approve or decline it. Please allow a few minutes for this process as it will take time. Once you room scan is passed you will see the image below on your screen.

11. Follow above steps 19-21 from the onboarding exam from the Learner Guide.
12. Once your room scan is approved, you will automatically be taken to the next step and proctoring will begin. If the position of your phone is not approved, your proctor will inform you via chat and you will be required to adjust it.

13. Proctoring is active.
a. A Live Proctor will be available during the session and can assist via the chat window on the bottom-right corner of the screen.
b. A blue border will be placed around the screen as a reminder that live proctoring is now in session.
c. The page will now be redirected to the Learner Portal.
d. Learners are advised to take a washroom break at this point of the exam set-up process. Please inform the proctor via the chat box before and after you take the washroom break.
Note: Once the exam has started, no washroom breaks will be permitted, except for pre-approved accommodations. Any unapproved breaks taken during the exam will lead to your exam being terminated immediately.
14. Login using your Learner ID (X*******) and Password. If you are experiencing issues logging into the learner portal (only), contact Humber technical support at 416-675-5025, option 4. Please notify the proctor through the chat box before calling technical support.

15. After you have logged in under My Current Courses, click on the appropriate exam link from the list shown.

16. You will be directed to the exam access page.
Course Exam
a. Select Click here to access the exam link.
b. Learner writing a course exam skip to step 14. 
Simulation Session Assessment
c. Select Click here to access the simulation session link.

d. Select the Start icon.

e. Click on the exam icon.

17. Click the Current tab to access the exam link.
a. Click on the appropriate link within the list shown. Further instructions will be provided on the screen.

18. The Start Exam button at the bottom of the screen will be inactive (greyed out) until the exam is unlocked.
19. Review the onscreen instructions carefully.
a. Take a few minutes to view the tour of the exam system by clicking the Take a Tour button at the bottom of the screen.

20. When you are ready to begin, please notify the proctor through the chat box.
21. Please wait while the proctor confirms that your exam is unlocked.
22. Once the Start Exam button turns GREEN; you may click it to begin the exam.

23. In the event your phone gets disconnected a pop up will appear informing you to reconnect the phone. Follow the instructions on the screen to re-connect the phone.

24. After you have attempted all the exam questions, you will be presented with a summary page for review.
a. Review the questions (including any questions bookmarked).
25. Submit the exam by clicking the SUBMIT button on the screen.
a. Once you have submitted your exam, NO FURTHER CHANGES to your answers will be permitted.

26. Select Close and proceed to end the proctoring.

27. Click the END button on any of the options shown below after submitting the exam, to end the proctoring manually.

28. Repeat steps 23 - 27 from the onboarding exam to end the proctoring
================================================================================
Appendix A - Onboarding Exam Rules
• All learners Must pass the onboarding exam at minimum 24 hours before the scheduled exam date.
• The onboarding exam is essential as it conducts a system check on your device.
• The onboarding exam should NOT be attempted on the scheduled exam date.
• Learners MUST have an approved onboarding exam in order to attempt the actual exam. • If the onboarding exam is not approved, learners will receive an email.
• Learners MUST attempt the onboarding exam again until it is approved.
• The onboarding exam status is visible in the learner’s account, on the main dashboard.
Sample Email Notifications
a. First time exam takers will receive an email notification from Proctortrack to complete the onboarding exam within a week of booking the exam. The email will include their Protortrack credentials.
b. Two follow up emails will be sent after completion of the onboarding exam. The first follow up email will confirm submission of the exam, the second follow up email will include details of the result of the exam.

c. Learners will receive a registration email 3-4business days prior to the scheduled exam date.

d. Learners will receive a confirmation email (see image below) from Proctortrack 12-24 hours prior to the scheduled exam date.

Appendix B – Removing Restrictions on Windows Device
Learners using a Windows device should follow the instructions below to grant Proctortrack access to monitor and record the test session without any issues. Please make sure that the settings below are enabled.
Click on the Connect button after downloading the proctortrack app for the first time. In the event you are not directed to the system check page, please follow these steps to remove any setting restrictions.
If you have any privacy setting restrictions, Proctortrack will not connect automatically. In that case, please follow the instructions below to complete the required privacy settings.
Select Start > Settings > Privacy > Camera. When prompted to Allow access to the camera on this device, select Change and make sure Camera access for this device is turned on.

Select Start > Settings > Privacy > Microphone. When prompted to Allow access to the microphone on this device, select Change and make sure microphone access for this device is turned on.

Appendix C – Mac Device Permissions
Learners using a Mac device should follow the instructions below to grant Proctortrack and the Exam browser access to monitor and record the test session without any issues. Please make sure that the settings below are enabled.
If you have any privacy setting restrictions, you will be directed to the Security and Privacy window automatically.
How to Allow Proctortrack Application:
1. Click on the "Apple Icon" and go to “System Settings”
 2. Go to “System Settings” >> “Privacy & Security”
 3. Go to “System Settings” >> “Privacy & Security” >> “Microphone”
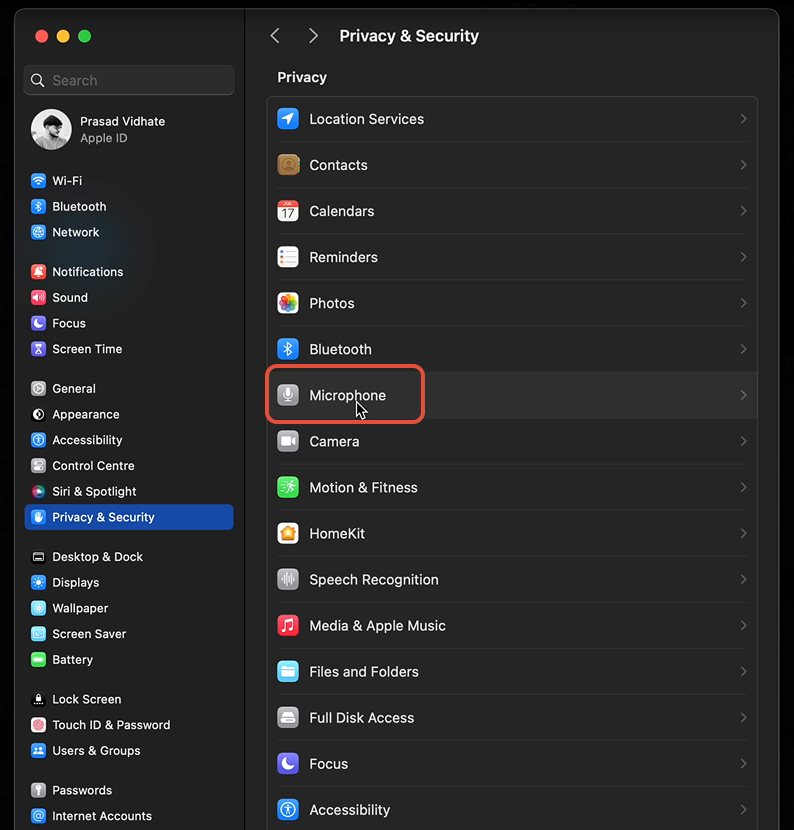
4. Go to “System Settings” >> “Privacy & Security” >> “Microphone” >> "To enable Proctortrack, simply toggle the switch in front of it."
 5. Go to “System Settings” >> “Privacy & Security” >> “Camera”
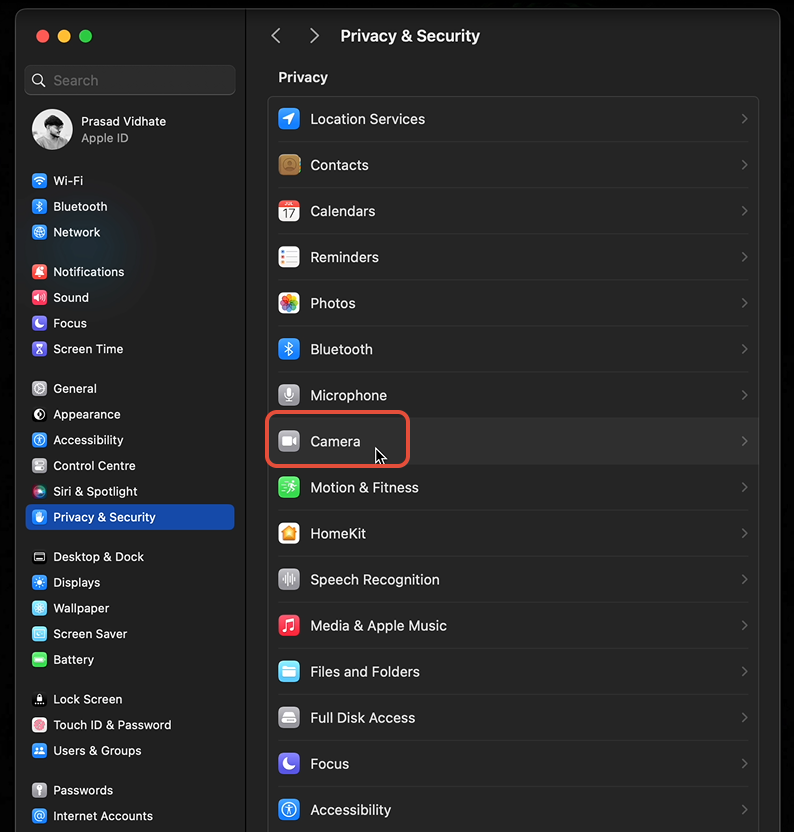
6. Go to “System Settings” >> “Privacy & Security” >> “Camera” >> "To enable Proctortrack, simply toggle the switch in front of it."

7. Go to “System Settings” >> “Privacy & Security” >> “Accessibility”
8. Go to “System Settings” >> “Privacy & Security” >> “Accessibility” >> "To enable Proctortrack, simply toggle the switch in front of it."

Note: If you cannot locate the Proctortrack application under Accessibility, click the (+) button and add the Proctortrack app from your download folder or applications.
9. Go to “System Settings” >> “Privacy & Security” >> “Screen & System Audio Recording”

10. Go to “System Settings” >> “Privacy & Security” >> “Screen & System Audio Recording” >> "To enable Proctortrack, simply toggle the switch in front of it."

Note: If you cannot locate the Proctortrack application under Screen & System Audio Recording, click the (+) button and add the Proctortrack app from your download folder or applications.
How to Allow Proctortrack Exam Browser Application:
1. Click on the "Apple Icon" and go to “System Settings”
 2. Go to “System Settings” >> “Privacy & Security”
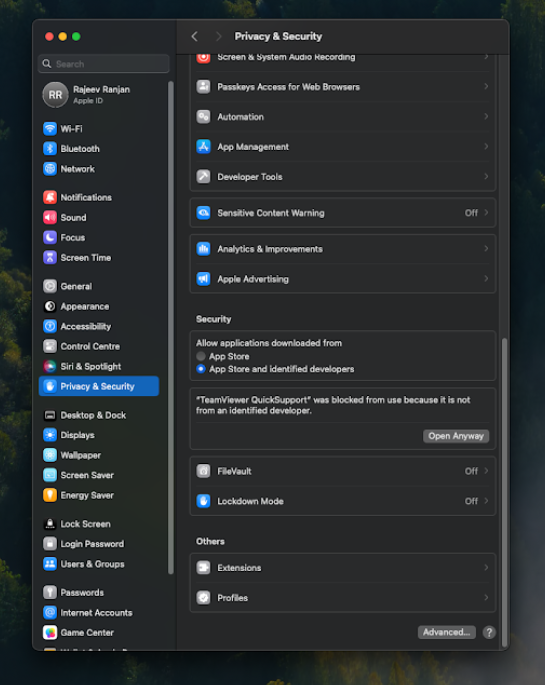
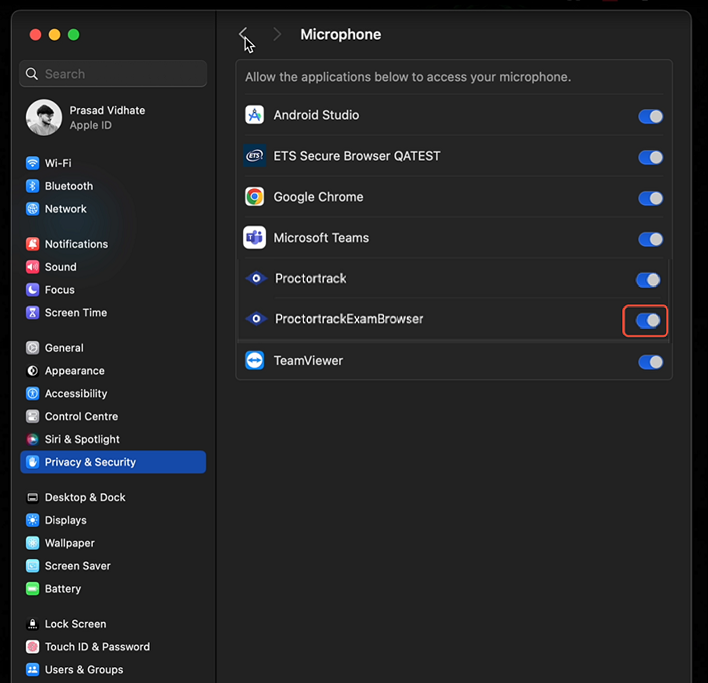
3. Go to “System Settings” >> “Privacy & Security” >> “Microphone”
4. Go to “System Settings” >> “Privacy & Security” >> “Microphone” >> "To enable Proctortrack Exam Browser, simply toggle the switch in front of it."
 5. Go to “System Settings” >> “Privacy & Security” >> “Accessibility”
6. Go to “System Settings” >> “Privacy & Security” >> “Accessibility” >> "To enable Proctortrack Exam Browser, simply toggle the switch in front of it."
 Note: If you cannot locate the Proctortrack Exam Browser application under Accessibility, click the (+) button and add the Proctortrack Exam Browser app from your download folder or applications.
7. In case you receive the following message, please click on "Quit & Reopen".

Note: For Mac Users: Once you have enabled the permission checks, the Proctortrack application will be in the system check phase. If not, please close the application and try launching again (refer to step 9). If you are still experiencing issues with the Proctortrack application, please contact Proctortrack support for assistance at 1(844) 966-1155.
Appendix D – Troubleshooting Onboarding


Appendix E – Troubleshooting Scheduled Exam

Appendix F- Acceptable Forms of Identification
