Taking The Quiz With Proctortrack App:
1. Click on Login to get to the login screen.

2. Please enter the username and password and click on Login.

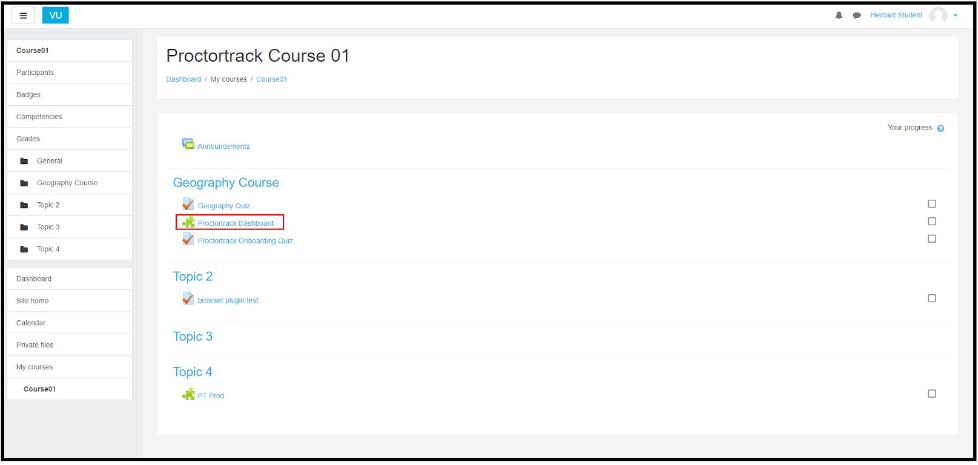
3. Select the desired course.

4. Click on Proctortrack Dashboard.
5. This is the Proctortrack Dashboard for the students. On the top, you have the Onboarding status. The Actual tests cannot be attempted unless the Onboarding profile is approved. Onboarding profile can be created by attempting the Onboarding test. The Onboarding test is a sample test. Every Test-taker needs to have an approved Onboarding Profile, before attempting any actual Tests.

6. On the Proctortrack Student Dashboard, you have the list of test below. Click on the Go to Test button for the test you would like to attempt. Here we will first attempt the Onboarding test . The Process for attempting the actual tests is the same as the Onboarding test.

7. (a) Read through the guidelines under the How it Works tab on the top, to further understand the steps required. Click the Next button to scroll through the steps.


(b) Scroll down to go through the Let’s Get Started section, and General Guidelines section to understand the guidelines for a proper testing environment and generic exam guidelines.

(c) After getting familiar with all the guidelines, check the box (at the bottom) labeled I have read, understand and will adhere to the required environment guidelines. Click Go To Next Step.

8. (a) Click on Download Proctortrack to download the app. Once the app is downloaded open it. If the App was downloaded during any previous exams/tests, the download page will detect the downloaded app and bring forward a pop-up window to click on Open Proctortrack to launch the application.

(b) Open the Proctortrack.zip (MAC) or Proctortrack.exe (Windows) file from the download bar at the bottom.

Using Proctortrack:
1. If it takes longer than 10 seconds to initiate the app, follow the instructions on the screen.
Step 1: Go back to the browser (you can drag the app to the side).
Step 2: Click on the Connect to Proctortrack button.
Step 3: Come back here and click anywhere inside the app.

2. You will be redirected to the “Agreement to Policies”. Please read the agreement policies, check the box below, and then click on “I AGREE”.

3. A 7-point System Check will automatically run to verify that the system is ready. Once the System Check is successfully conducted, click “CONTINUE” to start your onboarding. Follow the prompts till you reach the Face and ID scan.


You will be prompted to verify your identity. Ensure to read the information provided on the screen, then click on Continue to proceed.

4. You will now be prompted to complete a Face Scan. Click Start Scan and follow the instructions displayed on the page to ensure a proper face scan is captured.

5. If the face scan is blurry click on Retake to capture again. Once the face scan is captured click on Next to proceed.

6. You will now be prompted to complete the ID Scan. Make sure to Fit the ID within the frame in the correct alignment and hold it steady to ensure the text and your final ID scan is readable. Click Start Scan to proceed.

7. If the ID scan is blurry click on Retake to capture again. Once the ID scan is captured click on Next to proceed.

8. The Test Guidelines window shows the Proctoring or monitoring configurations and instructions on what is allowed during the exam. Read them carefully and click “START PROCTORING” to begin your proctoring session.

9. Proctoring has now begun. A blue border will be placed around the screen as a reminder that Proctortrack is now in session. Moodle will be brought to the forefront of the screen.

(a) You need to click on the Password button present on the top of the live video.

(b) Now click the ‘COPY’ button on the ‘Exam Password’ page.

(c) The password is generated, please follow the steps given in the ‘Ready to proceed!’ message box. CTRL+V is used for Windows.

(d) Similarly for MAC you get the below message. Command+V is used for MAC to paste the password.

10. Click on Attempt Quiz now.

11. Once the password is entered, click on "Submit".

12. (a) Take the exam as per the exam guidelines. Once completed, click on the Finish attempt.

(b) Click on Submit All and finish to submit the exam.

(c) Click on the Submit all and finish to confirm submission.

13. Once the exam is submitted, click on END to end the proctoring and upload the data.

14. Check the box next to "Yes, I have completed and submitted my test" then, click "END".

15. The session data will be automatically uploaded to Proctortrack.

16. The test session is complete! Either button seen here will close Proctortrack. Proctortrack will have to be run before each proctoring-enabled test.Click “QUIT APP” to save the application for use with later tests, or click “Uninstall” to remove Proctortrack from the current machine. Keep in mind that an opportunity to download Proctortrack will be given before each proctoring-enabled test.
