For Test-takers/Students use only.
Table of Contents
What do I need to take a test/assessment using Proctortrack?
How to attempt the Onboarding exam?
Using Proctortrack for Onboarding
How do I take tests/assessments with Proctortrack (Live Proctoring)?
Scheduling a Live Proctoring Exam.
Attempting a Live Proctored Exam.
Using Proctortrack for Live Proctoring
What is Proctortrack?
Proctortrack is the automatic remote proctoring solution your institution has selected for use during online tests/assessments. More information about Proctortrack’s privacy policies and technologies used can be found on our website.
How does it work?
The following guide will assist you, the test-taker/student, in going through the process of taking a proctored test/assessment with Proctortrack. Remember if you ever had any additional questions, you can call 1 (844) 753-2020 or go to www.proctortrack.com for additional information and live chat.
Why onboarding?
Often students are unsure if their specific hardware setup will allow them to use Proctortrack. While a detailed list of supported operating systems and browsers is available on Proctortrack.com, students often prefer to just test their own system themselves. Keep in mind that Chrome and Firefox are the recommended browser. While Proctortrack will work in other browsers, the user experience is far superior in Chrome.
The onboarding process gives students the opportunity to make sure everything is working correctly during low-pressure circumstances. It also gives students time to make any changes to their system well before the first exam.
Students can fail onboarding for the following reasons:
Facial scan missing or insufficient
ID scan missing or insufficient
ID scan shows invalid ID
Knuckle scan missing or insufficient
Environment lighting insufficient
If a student fails the onboarding exam, they will receive a notification listing the specific reasons for failure and be asked to re-take the onboarding exam.
For students onboarding appears exactly the same as a normal exam, to help familiarize them with the testing environment.
If you have any questions, please do not hesitate to contact Verificient support:
Proctortrack support: support@verificient.com, 1-844-753-2020
What do I need to take an exam using Proctortrack?

You will also need your Android phone or iPhone for this Live Proctoring Exam. The Smartphone is required for the room scans as well as acts as a secondary camera for Live Proctoring. It is recommended to install the Proctortrack App from the iOS App Store or Android Play store, before starting the assessment.
Simple 5-Step Process :
1. Create a baseline profile: attempt an Onboarding quiz.
2. Schedule the live proctoring quiz and begin the quiz on confirmed time.
3. Sync the Proctortrack desktop & phone app and submit the scans.
4. Start the quiz using the Event ID.
5. Submit the quiz and End the Proctoring on Desktop App and Mobile App.
Why attempt the Onboarding Quiz
To create a baseline profile (face and ID scans).
To verify/check computer hardware compatibility with Proctortrack and troubleshoot any issues during the Onboarding.
To get accustomed with the Proctortrack system and understand the steps in the process.
Students can fail the Onboarding for the following reasons: ● Missing or insufficient facial scan. ● Missing or insufficient ID scan. ● The ID scan shows an invalid ID. ● Insufficient environment lighting.
If a student fails the Onboarding exam, they will receive a notification listing the specific reasons for failure and be asked to retake the Onboarding test.
If you have any questions, please do not hesitate to contact Verificient support: ● Proctortrack support: support@verificient.com, 1-844-753-2020
This manual will provide steps on :
1. How to attempt the Onboarding exam.
2. How to attempt a Live proctored test/assessment for Avant using Proctortrack.
Steps to attempt Onboarding Quiz
● Login to https://app.avantassessment.com
● Click on ‘Go to Test’ button for the Onboarding quiz.
● Understand and agree to the guidelines.
● Download and run the Proctortrack app.
● Complete the Face and ID scans.
● Attempt the Sample quiz (non-graded) for practice.
● Once submitted, click the ‘End’ button to end the proctoring session.
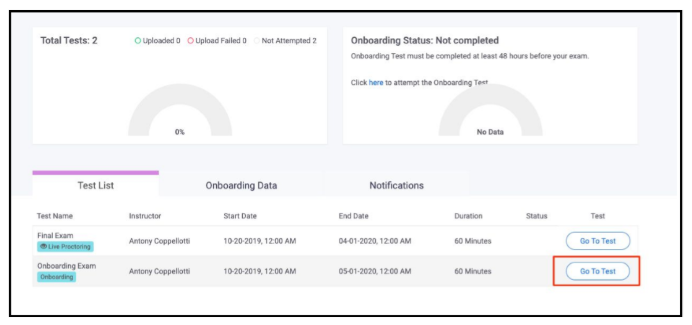
This is the Proctortrack Dashboard. On the top, you have the Onboarding status. Normally, Every Test-taker needs to have an approved Onboarding Profile, before attempting any actual tests/assessments.
A “Passed” Onboarding Status (Profile) is required in order to attempt any actual assessments/exams.
The available test/assessment cannot be attempted from the student account without a passed Onboarding profile.
1. Click on ‘Go To Test’ button for the Onboarding Exam and understand the guidelines.
2. Download and run the Proctortrack app and check the box to confirm the agreement with provided policies and guidelines.
Click on the ‘Download Proctortrack’ button and the Proctortrack app will start downloading.

3. Follow the on-screen instructions and complete the Face and ID scans.


4. The blue border around the screen shows that the proctoring is on. Launch and complete the sample test.
This is the sample test. Click on the “Launch Test” button to start the sample test.

5. Once the onboarding test is submitted, click on the ‘END’ button on the top border of the Proctortrack app.

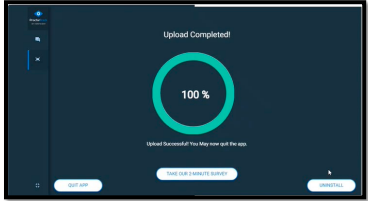
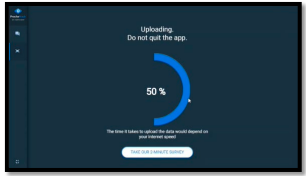
6. Check the box to confirm the upload and click on the END button.
7. Click 'QUIT APP' to save the application for use with later tests/assessments, or click 'Uninstall' to remove Proctortrack from the current machine

Schedule & begin a Live proctoring quiz
1. Click on the ‘Schedule’ button for the Exam with Live Proctoring.

2. Select the date and time, click on ‘ Schedule a session’ button to confirm and then click ‘Ok’.
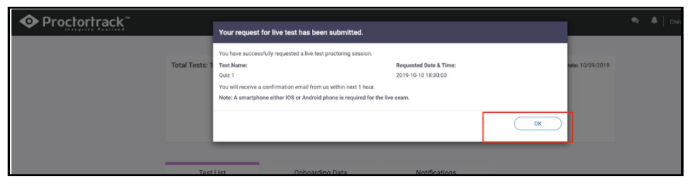
3. You may reschedule or cancel the exam by clicking on the ‘Requested’ button.

4. Once the scheduling is confirmed, you will be able to see the button change to ‘Confirmed’. Click on ‘Confirmed’ and then on ‘Go To Test’ once it becomes active at the scheduled time.


Sync the Proctortrack Desktop & Phone app
5. Go through the guidelines, as before.
6. Launch the Proctortrack app when prompted on the download page and complete the System check.
7. This is the Automated Face Scan. Please align your face in the outlined area to begin the scan automatically for verification.

8. Once Verification is Successful, it will proceed to the next step.

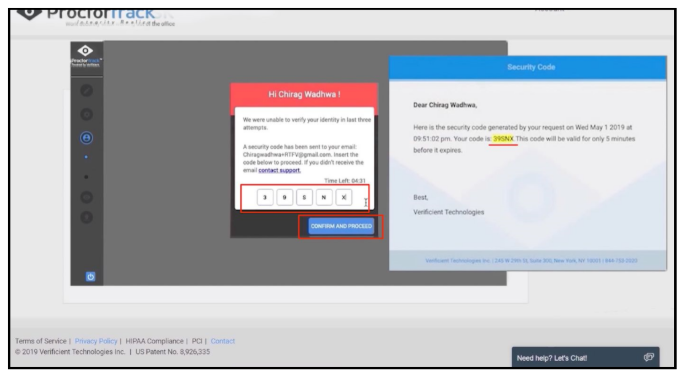
9. The test-taker gets 3 attempts to complete the verification. On failing the 3rd time, a security code is sent via email to the test-taker to proceed.
Sync the Proctortrack Desktop & Phone app
10. This step is to connect the Mobile App to continue with the Room scan and monitoring.

11. Phone App: Download the Proctortrack app from the Apple App Store or Google play store. Launch the app and follow the instructions.

12. Scan the QR code displayed on the desktop app using the mobile app.

13. Once the Phone app is connected, follow the on-screen instructions for the two-step room-scan.

Sync the Proctortrack Desktop & Phone app
14. Once the Room scan is complete, the Mobile App will provide instructions on how to place the mobile phone on the desk to continue with the proctoring/monitoring and the test. Please follow the instructions and ensure that you are visible on the display when the front selfie camera is active. Position your phone as shown in the example below. Once done, get back to the Desktop app and click on ‘Take me to the Next Page’, to proceed to your exam.

Starting the Quiz
15. Proctoring has now begun. A blue border will be placed around the screen as a reminder that Proctortrack is now in session.
16. The Test Code & Password required to begin the assessment will be provided by the Live Proctor via the chat window on the bottom-left of the screen.

17. At any point, if the mobile app quits or there is an issue with the mobile app. To continue with the session, click on the QR code button on the top border of the desktop app, and then scan the QR code again using the Proctortrack mobile app. Click on ‘Return to Exam’ to continue.
18. Please attempt the test as you normally would in a testing center environment. Once the test is complete, click on the ‘Stop Test’ button on the top right corner to submit the test, and then click ‘Logout’.

Submit quiz and End Proctoring
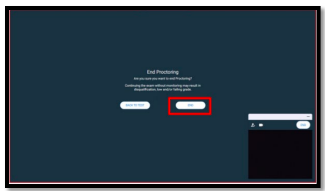
19. Once you submit the assessment and are logged out, click the 'End' button on the top-right corner to end the proctoring.

20. Check the box to confirm the upload and click on the END button.

21. Remember to end the monitoring/proctoring on the mobile app.
22. The test attempt is now complete. Click 'QUIT APP' to save the application for use with later tests/assessments, or click 'Uninstall' to remove Proctortrack from the current machine.